# 路由和控制器
更多详细信息,见官方文档 (opens new window)
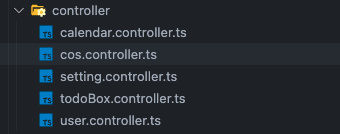
根据业务,我们分了一下以下 5 个控制器,用于处理不同业务

calendar.controller
- 日历视角、时间四象限
cos.controller
- 腾讯云 cos,文件上传相关
setting.controller
- 用户设置
todoBox.controller
- 待办箱
user.controller
- 登录注册、个人信息
# 设置全局路由前缀
一般情况下,后端的接口地址都是以 /api 开头,我们可以在 config.default.ts 文件中配置,将所有的控制器都加上该前缀
export default {
  koa: {
    globalPrefix: '/api',
    port: 7001,
  },
}
2
3
4
5
6
# 定义一个 controller
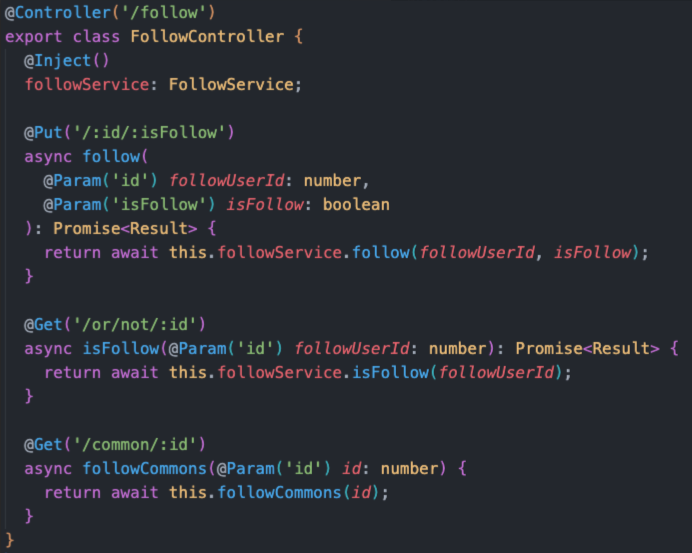
@inject`:注入相关的 `Service
@Put @Get:定义 http 请求方式
@Param:获取 Params 参数

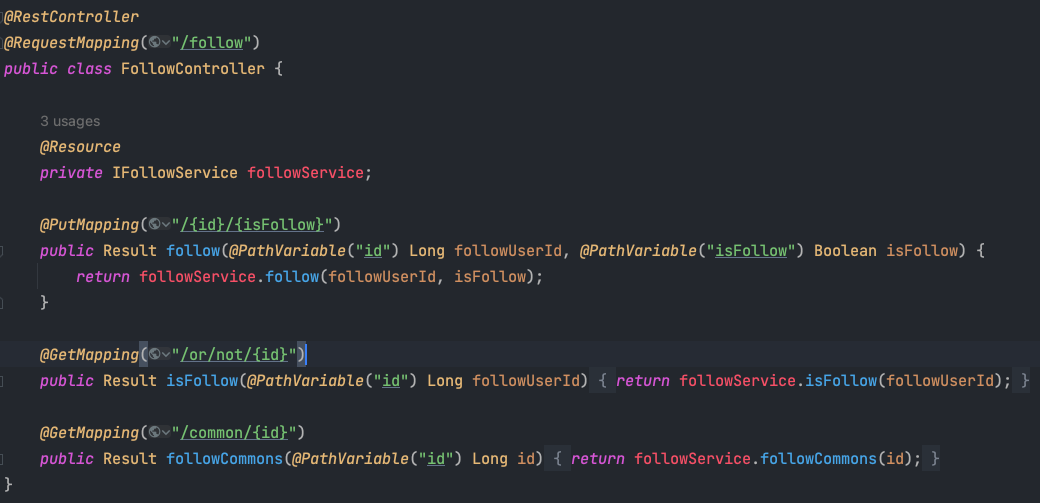
Java 宝,你看我们俩,像吗?
从页面仔 到 Spring 仔,其实也很快 🐶🐶🐶

# 关于装饰器语法
以下是题外话,它是实现装饰器语法的关键,知乎上也有好多关于装饰器的回答,感兴趣的小伙伴自行查看啦
# Reflect Metadata (opens new window)
# 服务和注入
更多详细信息,见 官方文档 (opens new window)
我们的业务逻辑,数据库的 CRUD,都会写在这里
它通过 @Provide() 装饰器暴露该服务。在Controller 或者代码调用处通过 @Inject() 装饰器注入
@Provide()
export class SettingService {
  @InjectEntityModel(SettingInfo)
  settingModel: Repository<SettingInfo>;

  @Inject()
  jwtService: JwtService;

  @Inject()
  ctx: Context;

  async saveSetting(settingInfo: SaveSettingDTO) {
    const { userId } = await getHeaderAuthInfo<TokenPayloadType>(
      this.jwtService,
      this.ctx.get('authorization')
    );

    const setting = await this.settingModel.findOneBy({ userId });
    if (setting) {
      await this.settingModel.update(userId, settingInfo);
      return 'ok';
    } else {
      const { startWeek, weekName } = settingInfo;
      const setting = await this.settingModel.create({
        userId,
        startWeek,
        weekName,
      });
      await this.settingModel.save(setting);
      return 'ok';
    }
  }
}
2
3
4
5
6
7
8
9
10
11
12
13
14
15
16
17
18
19
20
21
22
23
24
25
26
27
28
29
30
31
32
33
# 中间件
更多详细信息,见 官方文档 (opens new window)
Web 中间件是在控制器调用 之前 和 之后(部分)调用的函数。

基于这个特性,我们在项目中编写了以下 两个中间件
- 在控制器调用前,通过
jwt.middleware去校验token的合法性 - 在控制器调用后,通过
response.middware统一返回的数据结构
# jwt.middleware
在业务中比如 登录注册 这一类的请求在请求头中是不会携带 token 的,对于这一类的请求我们可以通过声明ignore方法要将其忽略掉。
import { Inject, Middleware } from '@midwayjs/decorator';

import { httpError } from '@midwayjs/core';
import { JwtService } from '@midwayjs/jwt';

import type { Context, NextFunction } from '@midwayjs/koa';
@Middleware()
export class JwtMiddleware {
  @Inject()
  jwtService: JwtService;

  resolve() {
    return async (ctx: Context, next: NextFunction) => {
      // 判断下有没有校验信息
      if (!ctx.headers['authorization']) {
        throw new httpError.BadRequestError();
      }
      // 从 header 上获取校验信息
      const parts = ctx.get('authorization').trim().split(' ');

      if (parts.length !== 2) {
        throw new httpError.BadRequestError();
      }

      const [scheme, token] = parts;

      if (/^Bearer$/i.test(scheme)) {
        try {
          await this.jwtService.verify(token, {
            complete: true,
          });
        } catch (error) {
          throw new httpError.UnauthorizedError();
        }
        await next();
      } else {
        throw new httpError.ForbiddenError();
      }
    };
  }

  ignore(ctx: Context): boolean {
    const ignorePathList = [
      '/api/user/register',
      '/api/user/sendCode',
      '/api/user/loginByPassword',
      '/api/user/loginByCode',
      '/api/user/forgetPassword',
      '/api/user/refreshToken',
    ];
    return ignorePathList.includes(ctx.path);
  }
}
2
3
4
5
6
7
8
9
10
11
12
13
14
15
16
17
18
19
20
21
22
23
24
25
26
27
28
29
30
31
32
33
34
35
36
37
38
39
40
41
42
43
44
45
46
47
48
49
50
51
52
53
# response.middware
通过await next() 方法的调用 ,我们可以获取到 控制器返回的执行结果,最终包装后返回给前端(调用方);
声明 match 方法,只有匹配到的路由才会执行该中间
import { IMiddleware } from '@midwayjs/core';
import { Middleware } from '@midwayjs/decorator';
import { NextFunction, Context } from '@midwayjs/koa';
/**
 * Response 中间件,返回成功态的 response
 */
@Middleware()
export class ResponseMiddleware implements IMiddleware<Context, NextFunction> {
  resolve() {
    return async (_ctx: Context, next: NextFunction) => {
      const data = await next();
      return {
        code: 200,
        msg: 'ok',
        data,
      };
    };
  }

  static getName = (): string => 'response';

  match = ctx => ctx.path.indexOf('/api') !== -1;
}
2
3
4
5
6
7
8
9
10
11
12
13
14
15
16
17
18
19
20
21
22
23
# 异常处理
更多详细信息,见 官方文档 (opens new window)
对于异常处理,我们大致可以分为两种,http 的异常处理 和 业务的异常处理
# http 异常处理
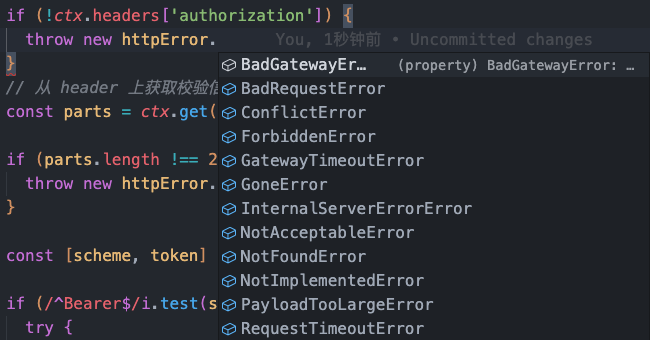
midway 官方给我们提供了 httpError 这个对象,并且内置了相关错误消息和状态码。比如说 401,403,503 这种的 http 状态码,我们就可以直接通过 throw 的方式往外抛

# 业务异常处理
在我们的日常开发中,往往也会和前端定义一些业务上的状态码。
比如我们在返回的数据结构中和前端约定只有 code 为 200 的情况下该请求才算成功,非 200 的情况下都为异常。


# 自定义异常类型
定义一个 DefaultError 用于处理业务上的异常,并统一抛状态码 500
import { HttpStatus, MidwayError } from '@midwayjs/core';
// 业务逻辑错误,统一往外抛 500 状态码
export class DefaultError extends MidwayError {
  constructor(message: string) {
    super(message, HttpStatus.INTERNAL_SERVER_ERROR.toString());
  }
}
// 使用
if (password !== userPassword) {
  throw new DefaultError('账号或密码错误');
}
2
3
4
5
6
7
8
9
10
11
# 异常处理器
通过 @Catch() 装饰器,我们可以捕获全局的错误,我们在上文中抛出的 DefaultError 也会走到这,我们在这里拿到相关的错误信息,最终返回统一的格式
当然@Catch() 也可以捕获特定的错误,就看你往 @Catch() 里面传递什么样的参数了
import { MidwayError } from '@midwayjs/core';
import { Catch } from '@midwayjs/decorator';
import { Context } from '@midwayjs/koa';

// 捕获所有错误
@Catch()
export class DefaultErrorFilter {
  async catch(err: MidwayError, ctx: Context) {
    // 错误日志
    ctx.logger.error('%j', err);
    return {
      code: err.code ?? 500,
      message: err.message ?? '服务器内部错误',
      data: null,
    };
  }
}
2
3
4
5
6
7
8
9
10
11
12
13
14
15
16
17
# configuration.ts中使用异常处理器
export class ContainerLifeCycle {
  @App()
  app: koa.Application;

  async onReady() {
    // add middleware
    this.app.useMiddleware([ResponseMiddleware, JwtMiddleware]);
    // add filter
    this.app.useFilter([DefaultErrorFilter]);
  }
}
2
3
4
5
6
7
8
9
10
11
# 参数校验
更多详细信息,见 官方文档 (opens new window)
对于前端通过请求传来的参数,我们可以使用官方提供的 Validate 组件进行校验;
比如对数据格式的校验、是否传递必传字段、字段是否可以传空、枚举值的处理等。
因为 Validate 组件是基于 joi (opens new window) 的,所以也可以使用 joi 的相关插件进行扩展,比如在项目中我们使用了 joiDate 去校验日期格式
另外官方了也提供了 PickDto 和 OmitDto 可以对原有的 DTO 进行扩展。
以下是相关的使用案例
import joiDate from '@joi/date';

export class EventInfoDTO {
  @Rule(RuleType.number())
  id: number;

  // 通过 joiDate 校验日期格式
  @Rule(
    RuleType.extend(joiDate)
      .date()
      .format('YYYY-MM-DD')
      .required()
      .error(new Error('startTime 日期格式为 YYYY-MM-DD'))
  )
  startTime: Date;

  // allow 虽然该字段必传,但允许为 空字符串
  @Rule(
    RuleType.string()
      .max(200)
      .allow('')
      .required()
      .error(new Error('description 字段限制 200 位以内的字符'))
  )
  description: string;

  // 处理枚举类型
  @Rule(RuleType.number().valid(DoneEnum.DONE, DoneEnum.UNDONE).required())
  isDone: DoneEnum;
}
2
3
4
5
6
7
8
9
10
11
12
13
14
15
16
17
18
19
20
21
22
23
24
25
26
27
28
29
30
