
 Midway基础
# 基础介绍
一个基于渐进式理念研发的 Node.js 框架。
基于 TypeScript 开发,结合了面向对象(OOP + Class + IoC)与函数式(FP + Function + Hooks)两种编程范式,并在此之上支持了 Web / 全栈 / 微服务 / RPC / Socket / Serverless 等多种场景,致力于为用户提供简单、易用、可靠的 Node.js 服务端研发体验。
# 面向对象(OOP + Class + IoC)
Midway 支持面向对象的编程范式,为应用提供更优雅的架构。
下面是基于面向对象,开发路由的示例。
// src/controller/home.ts
import { Controller, Get } from '@midwayjs/decorator';
import { Context } from '@midwayjs/koa';

@Controller('/')
export class HomeController {

  @Inject()
  ctx: Context

  @Get('/')
  async home() {
    return {
      message: 'Hello Midwayjs!',
      query: this.ctx.ip
    }
  }
}
2
3
4
5
6
7
8
9
10
11
12
13
14
15
16
17
18
# 函数式(FP + Function + Hooks)
Midway 也支持函数式的编程范式,为应用提供更高的研发效率。
下面是基于函数式,开发路由接口的示例。
// src/api/index.ts

import { useContext } from '@midwayjs/hooks'
import { Context } from '@midwayjs/koa';

export default async function home () {
  const ctx = useContext<Context>()

  return {
    message: 'Hello Midwayjs!',
    query: ctx.ip
  }
}
2
3
4
5
6
7
8
9
10
11
12
13
# 初始化
npm init midway

# 运行
npm run dev
2
3
4
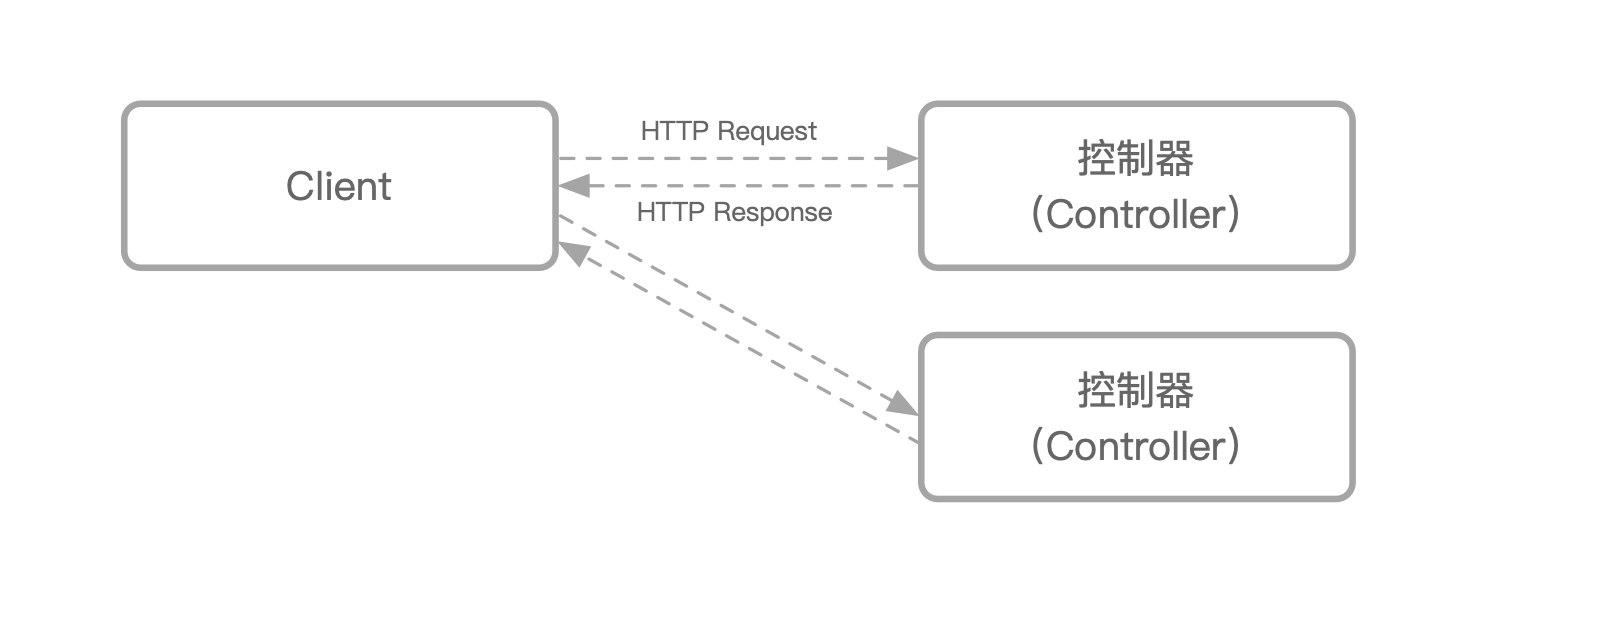
# Controller
控制器,用于负责 解析用户的输入,处理后返回相应的结果。
在 controller 目录中,新建一个 src/controller/weather.controller.ts 文件,内容如下。
import { Controller, Get } from '@midwayjs/decorator';

@Controller('/')
export class WeatherController {
  // 这里是装饰器,定义一个路由
  @Get('/weather')
  async getWeatherInfo(): Promise<string> {
    // 这里是 http 的返回,可以直接返回字符串,数字,JSON,Buffer 等
    return 'Hello Weather!';
  }
}
2
3
4
5
6
7
8
9
10
11
现在我们可以通过访问 /weather 接口返回数据了。
# 处理参数
通过添加 @Query 装饰器,我们可以获取到 URL 上的参数。
import { Controller, Get, Query } from '@midwayjs/decorator';

@Controller('/')
export class WeatherController {
  @Get('/weather')
  async getWeatherInfo(@Query('id') cityId: string): Promise<string> {
    return cityId;
  }
}
2
3
4
5
6
7
8
9
访问:http://localhost:7001/weather?id=444
返回:444
2
# Service
在实际项目中,Controller 一般用来接收请求参数,校验参数,不会包括特别复杂的逻辑,复杂而复用的逻辑,我们应该封装为 Service 文件。
添加一个 Service 用来获取天气信息,其中包括一个 http 请求,获取远端的数据:
// src/service/weather.service.ts
import { Provide } from '@midwayjs/decorator';
import { makeHttpRequest } from '@midwayjs/core';

@Provide()
export class WeatherService {
  async getWeather(cityId: string) {
    return makeHttpRequest(`http://www.weather.com.cn/data/cityinfo/${cityId}.html`, {
      dataType: 'json',
    });
  }
}
2
3
4
5
6
7
8
9
10
11
12
信息
1、
makeHttpRequest方法是 Midway 内置的 http 请求方法,更多参数请查看 文档 (opens new window)2、示例中的城市天气信息来自于中国中央气象台 API
# 类型定义
良好的类型定义可以帮助我们减少代码错误。
// src/interface.ts

// ...

export interface WeatherInfo {
  weatherinfo: {
    city: string;
    cityid: string;
    temp: string;
    WD: string;
    WS: string;
    SD: string;
    AP: string;
    njd: string;
    WSE: string;
    time: string;
    sm: string;
    isRadar: string;
    Radar: string;
  }
}
2
3
4
5
6
7
8
9
10
11
12
13
14
15
16
17
18
19
20
21
# 使用定义
import { Provide } from '@midwayjs/decorator';
import { makeHttpRequest } from '@midwayjs/core';
import { WeatherInfo } from '../interface';

@Provide()
export class WeatherService {
  async getWeather(cityId: string): Promise<WeatherInfo> {
    const result = await makeHttpRequest(`http://www.weather.com.cn/data/sk/${cityId}.html`, {
      dataType: 'json',
    });

    if (result.status === 200) {
      return result.data;
    }
  }
}
2
3
4
5
6
7
8
9
10
11
12
13
14
15
16
信息
- 1、这里使用
@Provide装饰器修饰类,便于后续 Controller 注入该类
# 匹配 Controller
修改之前的 Controller 文件。
import { Controller, Get, Inject, Query } from '@midwayjs/decorator';
import { WeatherInfo } from '../interface';
import { WeatherService } from '../service/weather.service';

@Controller('/')
export class WeatherController {

  @Inject()
  weatherService: WeatherService;

  @Get('/weather')
  async getWeatherInfo(@Query('cityId') cityId: string): Promise<WeatherInfo> {
    return this.weatherService.getWeather(cityId);
  }
}
2
3
4
5
6
7
8
9
10
11
12
13
14
15
信息
- 1、这里使用
@Inject装饰器注入WeatherService,是 Midway 依赖注入的标准用法,可以查看 这里 (opens new window) 了解更多 - 2、这里也同步修改了方法的返回值类型
到这里,我们可以请求 http://127.0.0.1:7001/weather?cityId=101010100 查看返回的结果。
# 模板渲染
Midway 对应的扩展包我们称为 “组件”,也是标准的 npm 包。
这里我们需要用到 @midwayjs/view-nunjucks 组件。
可以使用下面的命令安装。
$ npm i @midwayjs/view-nunjucks --save
# 启用组件
安装完成后,我们在 src/configuration.ts 文件中启用组件。
// ...
import * as view from '@midwayjs/view-nunjucks';

@Configuration({
  imports: [
    koa,
    // ...
    view
  ],
  importConfigs: [join(__dirname, './config')],
})
export class ContainerLifeCycle {
  // ...
}
2
3
4
5
6
7
8
9
10
11
12
13
14
信息
- 1、
configuration文件是 Midway 的生命周期入口文件,承担了组件开关,配置加载和生命周期管理的作用 - 2、
imports就使用来导入(开启)组件的方法
# 指定模板
在 src/config/config.default.ts 中配置组件,指定为 nunjucks 模板。
// src/config/config.default.ts

import { MidwayConfig } from '@midwayjs/core';

export default {
  // ...
  view: {
    defaultViewEngine: 'nunjucks',
  },
} as MidwayConfig;
2
3
4
5
6
7
8
9
10
在根目录(非 src 里)添加模板 view/info.html 文件,内容如下:
<!DOCTYPE html>
<html>
  <head>
    <title>天气预报</title>
    <style>
      .weather_bg {
        background-color: #0d68bc;
        height: 150px;
        color: #fff;
        font-size: 12px;
        line-height: 1em;
        text-align: center;
        padding: 10px;
      }

      .weather_bg label {
        line-height: 1.5em;
        text-align: center;
        text-shadow: 1px 1px 1px #555;
        background: #afdb00;
        width: 100px;
        display: inline-block;
        margin-left: 10px;
      }

      .weather_bg .temp {
        font-size: 32px;
        margin-top: 5px;
        padding-left: 14px;
      }
      .weather_bg sup {
        font-size: 0.5em;
      }
    </style>
  </head>
  <body>
    <div class="weather_bg">
      <div>
        <p>
          {{city}}({{WD}}{{WS}})
        </p>
        <p class="temp">{{temp}}<sup>℃</sup></p>
        <p>
          气压<label>{{AP}}</label>
        </p>
        <p>
          湿度<label>{{SD}}</label>
        </p>
      </div>
    </div>
  </body>
</html>
2
3
4
5
6
7
8
9
10
11
12
13
14
15
16
17
18
19
20
21
22
23
24
25
26
27
28
29
30
31
32
33
34
35
36
37
38
39
40
41
42
43
44
45
46
47
48
49
50
51
52
# 进行模板渲染
调整 Controller 的代码,将返回 JSON 变为模板渲染。
// src/controller/weather.controller.ts
import { Controller, Get, Inject, Query } from '@midwayjs/decorator';
import { WeatherService } from '../service/weather.service';
import { Context } from '@midwayjs/koa'; // 这里 koa 是一个轻量易用的 Web 框架,需要单独引入包来作为上层框架

@Controller('/')
export class WeatherController {

  @Inject()
  weatherService: WeatherService;

  @Inject()
  ctx: Context;

  @Get('/weather')
  async getWeatherInfo(@Query('cityId') cityId: string): Promise<void> {
    const result = await this.weatherService.getWeather(cityId);
    if (result) {
      await this.ctx.render('info', result.weatherinfo);
    }
  }
}
2
3
4
5
6
7
8
9
10
11
12
13
14
15
16
17
18
19
20
21
22
到这一步,我们访问 http://127.0.0.1:7001/weather?cityId=101010100 已经可以看到渲染的模板内容了。
# 错误处理
一般来说,所有对外的调用都要做异常处理,并且将异常转变为我们自己业务的错误,这样才能有更好的体验。
为此,我们需要定义一个我们自己的业务错误,创建一个 src/error/weather.error.ts 文件。
// src/error/weather.error.ts
import { MidwayError } from '@midwayjs/core';

export class WeatherEmptyDataError extends MidwayError {
  constructor(err?: Error) {
    super('weather data is empty', {
      cause: err,
    });
    if (err?.stack) {
      this.stack = err.stack;
    }
  }
}
2
3
4
5
6
7
8
9
10
11
12
13