# 技术方案
- 服务器安装
gitlab runner,并编写gitlab-ci.yml文件 - 通过
oss-utils或oss sdk将产物上传到 阿里云 oss
# 最终实现
可以通过 https://tutulist.cn 访问前端资源
# 安装 gitlab 和 gitlab runner
大部分企业其实都会私有化一个 gitlab 供自己公司内部使用,但是私有化一个 gitlab 是有服务器配置要求的;
# 官方建议配置
cpu 4核 是推荐的最小核数,可以支持 500 个用户;
内存 4G 是最小内存,可以支持 500 个用户;
所以说,如果要想私有化一个 gitlab 仓库,你就需要购买了一个最低 cpu 4核 ,内存 4G 的服务器。
因为我们的测试服务器配置并不高,所以我们只在服务器上跑一个 gitlab runner,gitlab仓库使用官方仓库。
# 安装 gitlab runner
docker run -d --name gitlab-runner --restart always \
  -v /srv/gitlab-runner/config:/etc/gitlab-runner \
  -v /var/run/docker.sock:/var/run/docker.sock \
  gitlab/gitlab-runner:latest
2
3
4
通过 docker ps命令查看,gitlab runner 是否已经运行

# 注册 gitlab-runner
这一步主要就是将我们服务器上的 runner 与 gitlab 代码仓库建立联系
docker run --rm -it \
 -v /srv/gitlab-runner/config:/etc/gitlab-runner \
 gitlab/gitlab-runner \
 register
2
3
4
输入后,会要求键入一些配置
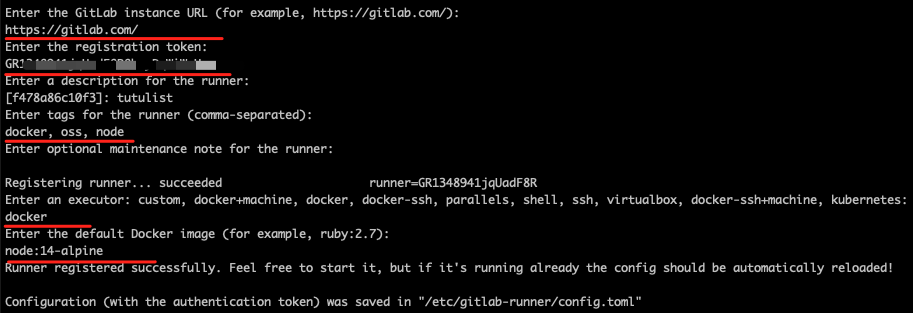
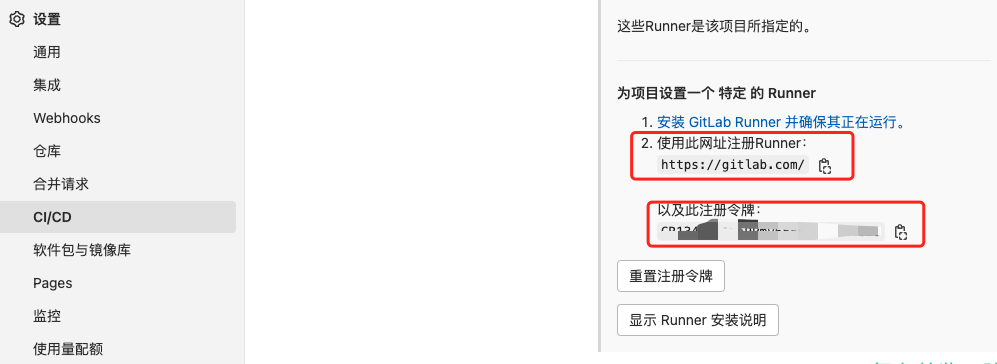
- GitLab instance URL 和 registration token 我们可以在 gitlab 页面中找到
路径:随便打开一个项目 -> 设置 -> CI/CD -> Runner -> 展开
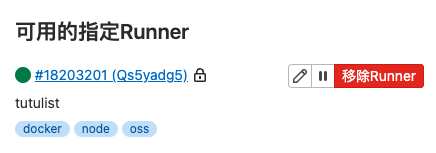
输入完成后,我们刷新 gitlab runner 页面,就可以看到我们创建的 runner 了
# 编写 .gitlab-ci.yml 文件
有了 runner,这个时候我们就可以跑流水线
# 流水线中的常用命令
以下命令只是常用命令的简单理解,更多详细的信息和其它命令还行查阅官方文档 (opens new window)
# image
指定基础镜像,因为我们通过 npm 执行相关命令,所以需要使用 node 镜像
# workflow
来确定是否创建流水线。 在顶层定义此关键字,使用单个 rules 关键字来判断
在这里我们使用了两个变量$CI_MERGE_REQUEST_TARGET_BRANCH_NAME 和 $CI_DEFAULT_BRANCH
当合并目标分支为 master,该流水线才能运行
关于更多的环境变量,还请查阅文档 (opens new window)
# stages
阶段,在上图中,红色框内的就是 stages,install、lint、build、deploy 就是我们声明的阶段
拿一个前端项目举例,这四个步骤我们可以做以下事情
- install:执行 npm install ,安装项目所需要的依赖
- lint:执行 npm run lint,校验项目是否有语法错误或者类型错误
- build:执行 npm run build,构建前端静态产物
- deploy:将 build 构建出的产物进行部署

# cache
job 之间缓存的文件,在每一个 job 之间可以共享
# job
表示构建的作业(或称之为任务),上图,绿色框中的就是 job 表示某个 stage 里面执行的具体任务
# stage
指定当前 job 属于哪一个 stages
# script
当前 job 需要执行的 shell 命令
# artifacts
当前 job 执行后的产物,可以通过 paths 指定产物的存放路径,expire_in 指定产物的过期时间
在这分享一个面试题,catch 和 artifacts 有什么区别?
# only
定义当前 job 在何时运行。
# ossutil64 使用
-r :递归操作
-f :强制操作,不进行询问提示
--meta :配置文件元信息 (header)
# .gitlab-ci.yml 简单示例
image: node:14-alpine

# 只有往 master 分支合并的时候才执行此流水线
workflow:
  rules:
    - if: $CI_MERGE_REQUEST_TARGET_BRANCH_NAME == $CI_DEFAULT_BRANCH
      when: always

# 定义三个阶段
stages:
  - install
  - build
  - deploy

# 缓存产物,在多个 job 之间共享
cache:
  - key: node-modules
    paths:
      - node_modules

install:
  stage: install
  script:
    - npm install cnpm --global --registry=https://registry.npmmirror.com
    - cnpm i
  only: # 只有 package.json 文件更改时,才重新跑 install
    changes:
      - "package.json"
  retry: 2 # install 失败重试次数

build:
  stage: build
  script: npm run build
  artifacts:
    paths:
      - dist
    expire_in: 1 hrs # 设置作品留存时间,1小时后自动失效

# 使用 oss 脚本上传
deploy:
  stage: deploy
  script:
    - wget https://gosspublic.alicdn.com/ossutil/1.7.14/ossutil64
    - chmod 755 ossutil64
    - ./ossutil64 config -i ${accessKeyID} -k ${accessKeySecret} -e ${endPoint} -L CH -c ~/.ossutilconfig
    - ./ossutil64 -c ~/.ossutilconfig cp -r -f --meta Cache-Control:no-cache dist oss://tutulist-web-static/
    - ./ossutil64 -c ~/.ossutilconfig cp -r -f --meta Cache-Control:max-age=31536000 dist/assets oss://tutulist-web-static/assets

# 使用 oss sdk上传
# deploy:
#   stage: deploy
#    script: npm run deploy:oss
2
3
4
5
6
7
8
9
10
11
12
13
14
15
16
17
18
19
20
21
22
23
24
25
26
27
28
29
30
31
32
33
34
35
36
37
38
39
40
41
42
43
44
45
46
47
48
49
50
51
52
# deployOss.js 部署脚本
- 不带
hash的文件,设置no-cache并直接上传 - 带
hash的文件,上传前先判断oss中是否已存在该文件,不存在才上传,并配置 1 年的缓存时间 - 上传完成后,将本地的构建产物 和
oss上的文件进行对比,删除oss冗余的文件
import fs from "node:fs/promises";

import { dirname } from "node:path";
import { fileURLToPath } from "node:url";

import dotEnv from "dotenv";
import OSS from "ali-oss";

// 获取环境变量
dotEnv.config();

const __filename = fileURLToPath(import.meta.url);
const distPath = `${dirname(__filename)}/dist`;

const client = new OSS({
  region: "oss-cn-beijing",
  accessKeyId: process.env.ACCESS_KEY_ID,
  accessKeySecret: process.env.ACCESS_KEY_SECRET,
  bucket: "tutulist-web-static",
});

const deploy = async () => {
  await uploadNoCacheFile();
  await uploadCacheFile();
  // 删除冗余 oss 文件
  await removeExtraFile();
};

const uploadNoCacheFile = async () => {
  const dir = await fs.opendir(distPath);
  // 上传非 hash 资源
  for await (const dirent of dir) {
    if (dirent.name !== "assets") {
      await client.put(dirent.name, `${distPath}/${dirent.name}`, {
        headers: {
          "Cache-Control": "no-cache",
        },
      });
    }
  }
  console.log("🚀 非 hash 文件上传成功");
};

// 上传带 hash 的资源
const uploadCacheFile = async () => {
  const assetPath = `${distPath}/assets`;
  const dir = await fs.opendir(assetPath);
  for await (const dirent of dir) {
    const filePath = `assets/${dirent.name}`;
    const isExist = await isExistObject(filePath);
    if (!isExist) {
      await client.put(`assets/${dirent.name}`, `${assetPath}/${dirent.name}`, {
        headers: {
          "Cache-Control": "max-age=31536000",
        },
      });
    }
  }
  console.log("🚀 hash 文件上传成功");
};

const isExistObject = async (name, options = {}) => {
  try {
    await client.head(name, options);
    return true;
  } catch (error) {
    return false;
  }
};

// 删除老的文件
const removeExtraFile = async () => {
  const { res, objects } = await client.list({
    prefix: "assets/",
  });
  // 将最后一次的产物与 oss 中已有的做对比,将不存在的进行删除
  if (res.status === 200) {
    const notExistFileList = [];
    const __filename = fileURLToPath(import.meta.url);
    const distPath = `${dirname(__filename)}/dist`;

    for (let ossPath of objects) {
      try {
        await fs.access(`${distPath}/${ossPath.name}`);
      } catch (error) {
        notExistFileList.push(ossPath.name);
      }
    }

    if (notExistFileList.length) {
      client.useBucket("tutulist-web-static");

      console.log("🚀 发现 oss 中存在冗余文件,正在删除。。。");
      try {
        const {
          res: { status },
        } = await client.deleteMulti(notExistFileList);
        if (status === 200) {
          console.log("🚀 冗余 oss 文件已删除");
        }
      } catch (error) {
        console.log(`❌ 冗余 oss 文件 删除失败`);
      }
    } else {
      console.log("❗️ 未发现冗余 oss 文件");
    }
    process.exit(0);
  }
};

// 执行部署代码;
deploy();
"script": {
  ...忽略其它
  "deploy oss": "node deployOss.js",
}
2
3
4
5
6
7
8
9
10
11
12
13
14
15
16
17
18
19
20
21
22
23
24
25
26
27
28
29
30
31
32
33
34
35
36
37
38
39
40
41
42
43
44
45
46
47
48
49
50
51
52
53
54
55
56
57
58
59
60
61
62
63
64
65
66
67
68
69
70
71
72
73
74
75
76
77
78
79
80
81
82
83
84
85
86
87
88
89
90
91
92
93
94
95
96
97
98
99
100
101
102
103
104
105
106
107
108
109
110
111
112
113
114
115
116
tips:在部署时还是遇到了一个问题了,每次使用 vite 构建时,不管文件内容有没有更改,文件的 hash 都会变,这就代表着,在使用部署脚本时,每次上传到 oss 都是全量的推送。
目前文件 hash 这个问题 github 已经有这个 issue (opens new window) 了,但还是 open 状态,持续关注着吧。不过,我猜 vue-cli 一定不会有这个问题 🐶🐶🐶
# 配置 CI/CD 变量
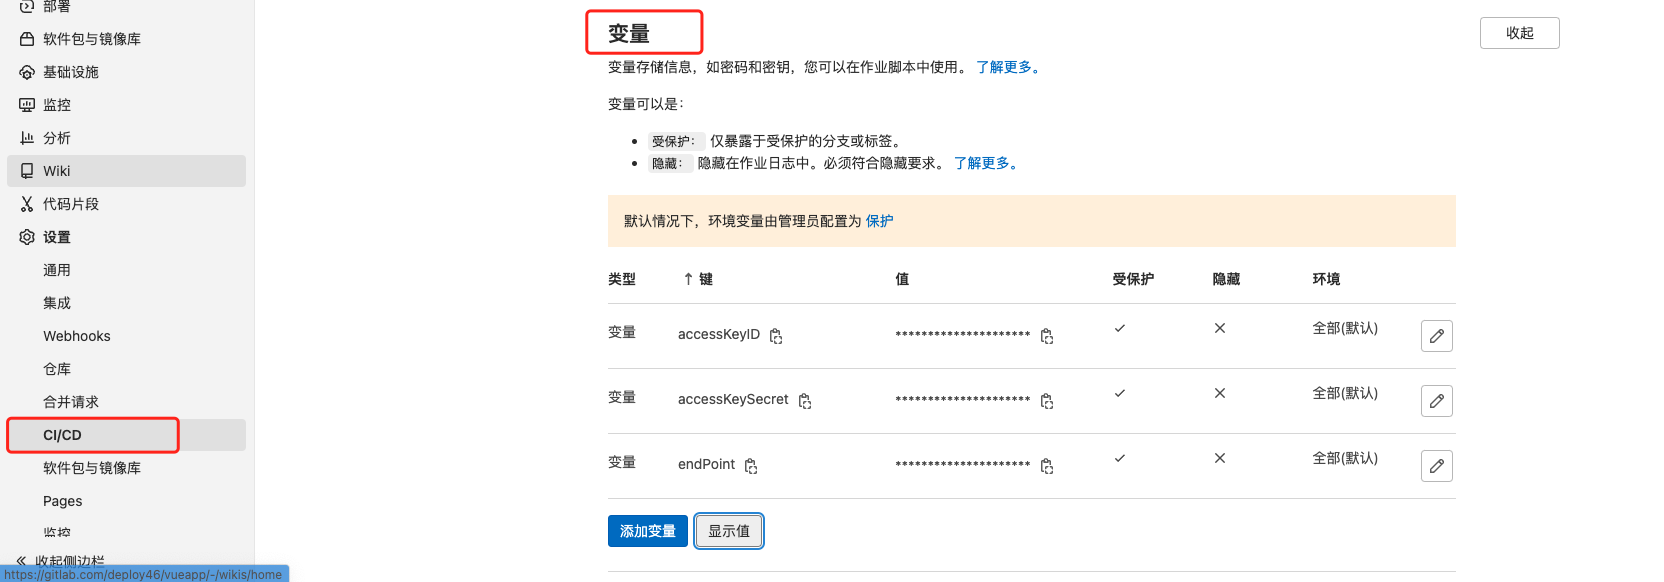
在通过 ossutil 部署时,对于 oss 的密钥,如果不想直接写明文,那么我们可以通过声明CI/CD变量的形式注入到脚本中,最终在 yml文件中可以通过 ${变量} 的形式获取
# 阿里云 oss 对象存储
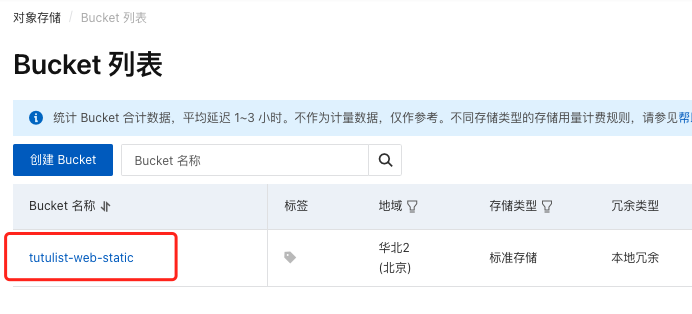
# 创建 Bucket
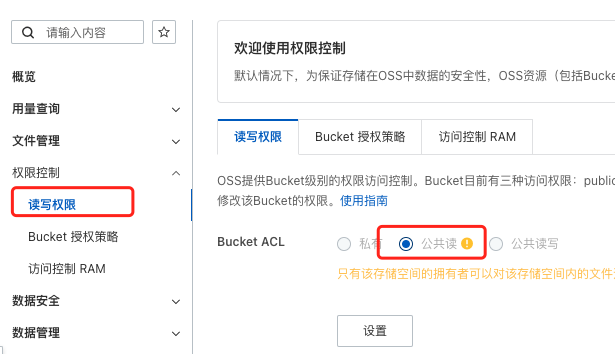
# 配置 Bucket 读写权限
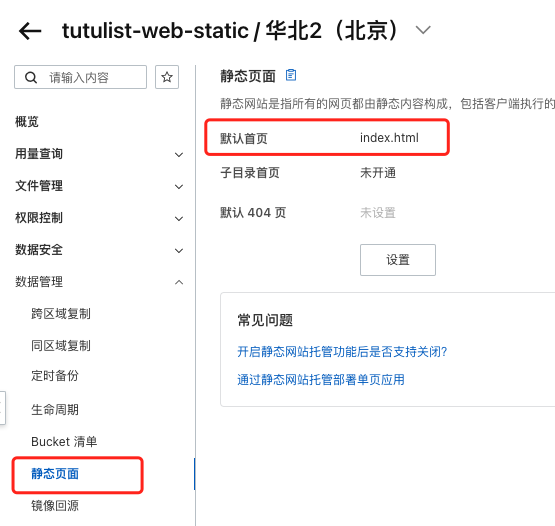
# 配置静态页面
# 绑定域名
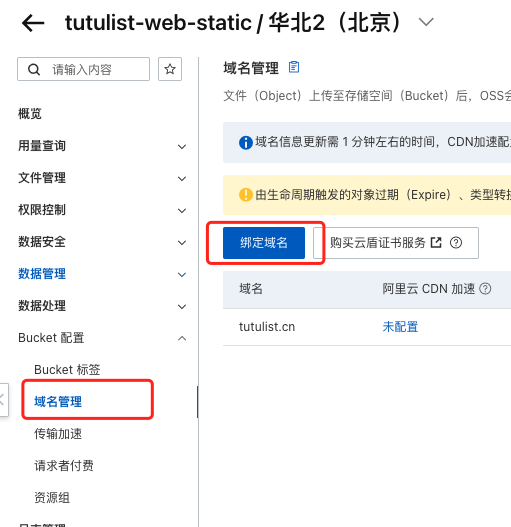
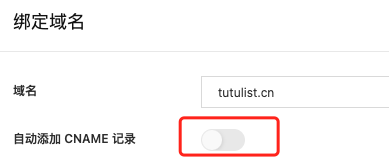
勾选自动添加 CNAME 记录,将 oss 域名 和自己域名进行绑定
# 创建一个新分支,进行测试
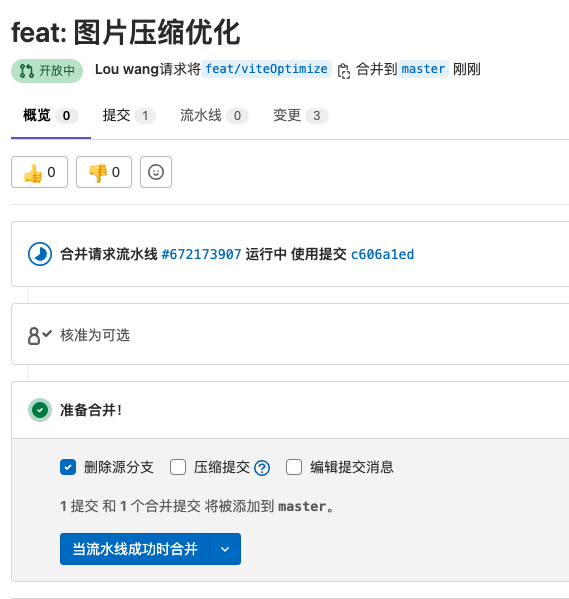
当我们将功能分支合并到 master 分支时,流水线就开始工作了
