# 封装日历组件
时间的处理库选用 dayjs (opens new window)。
npm install dayjs
# 组件搭建
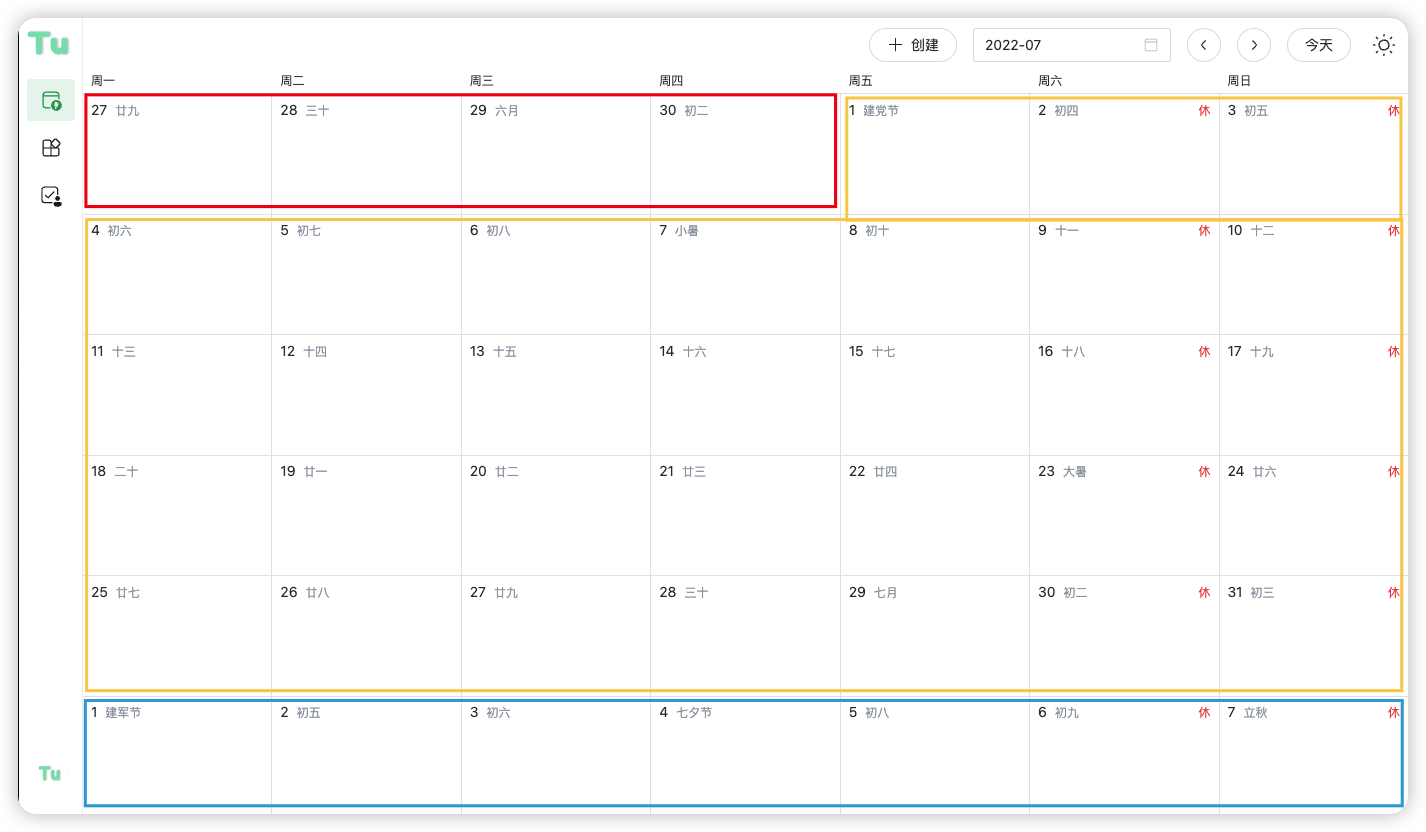
在日历中我们每一个月需要展示的天数是 42 天;
相当于,上月末(红色部分) + 本月(黄色部分)+ 下月初(蓝色部分)= 42 天;
下面我们就分别获取这三部分需要渲染的天数。

# 获取上个月需要渲染的天数
以 2022 年 7 月为例,因为7月1日是周五,所以6月需要渲染周一到周四共四天进行补位:
import dayjs from "dayjs";
// 获取指定时间
const currrentDate = dayjs("2022-07");

// 获取单月第一天是周几
const firstDayWeek = currrentDate.startOf("month").day();

// 获取指定时间的上一月
const lastMonth = currrentDate.subtract(1, "M");

// 获取上一个月的所有天数
const lastMonthDays = lastMonth.daysInMonth();

// 渲染结果
const renderDayList = [];

// 获取上月的渲染结果
for (let i = 0; i < firstDayWeek - 1; i++) {
  const year = lastMonth.get("y");
  const month = lastMonth.get("month") + 1; // 0为1月所以加一
  const day = lastMonthDays - i;
  const date = dayjs(`${year}-${month}-${day}`).format("YYYY-MM-DD");
  renderDayList.push(date);
}
// 上月的信息是反向添加的,需要做一下反转
renderDayList.reverse();
2
3
4
5
6
7
8
9
10
11
12
13
14
15
16
17
18
19
20
21
22
23
24
25
26
# 获取本月的渲染结果
本月渲染天数最简单了,只需要遍历本月天数就可以了。
// 获取当月的渲染结果
const currrentDays = currrentDate.daysInMonth();

for (let i = 0; i < currrentDays; i++) {
  const year = currrentDate.get("y");
  const month = currrentDate.get("month") + 1; // 0为1月所以加一
  const day = i + 1;
  const date = dayjs(`${year}-${month}-${day}`).format("YYYY-MM-DD");
  renderDayList.push(date);
}
2
3
4
5
6
7
8
9
10
# 下月的渲染天数
渲染的总数(42天)- (上个月渲染的天数 + 本月渲染的天数 ) = 下个月渲染的天数
// 基于本月获取下月
const nextMonth = currrentDate.add(1, "M");

// 获取下月的渲染天数
const nextMonthDays = 42 - renderDayList.length;
for (let i = 0; i < nextMonthDays; i++) {
  const year = nextMonth.get("y");
  const month = nextMonth.get("month") + 1; // 0为1月所以加一
  const day = i + 1;
  const date = dayjs(`${year}-${month}-${day}`).format("YYYY-MM-DD");
  renderDayList.push(date);
}
2
3
4
5
6
7
8
9
10
11
12
渲染结果

# 处理农历
社区有一个处理农历的库 solarlunar (opens new window)。
npm i solarlunar
因为是 js 文件。我们需要给他定义 ts。
/**
 * term 节气 string
 * dayCn 农历日中文名称 string
 * monthCn 农历月中文名称,如果为闰月,则会在月份前增加 闰 字 string
 * cMonth 公历月 number
 * lMonth 农历月 number
 * lDay 农历日 number
 * @doc:https://www.npmjs.com/package/solarlunar
 */
declare module "solarLunar" {
  //    const types= solar2lunar(year, month, day)=
  export default { term, dayCn, monthCn, lMonth, lDay };
}
2
3
4
5
6
7
8
9
10
11
12
13
# 处理节假日
节假日和调休信息获取可以从网上免费的第三方 API 获取,也有手动维护最近几年的调休数据的第三方库,
目前我们使用的是 chinese-workday (opens new window),但是这个包升级到了 vite3 之后,在安装了 vite-plugin-commonjs插件后打包就会报错,所以在项目中,所以我们将 chinese-workday 这个包的内容手动维护了一份,并且暴露了三个 API
isHoliday:判断是否是假期
isAddtionalWorkday:判断是否补班
getFestival:获取节假日的名称
# 处理起始周
根据用户习惯的不同,一个周的起始周可以是周日,也可以是周一;

当起始周为周日时,上月末的时间需要多渲染一天,对应到代码上,将 firstDayWeek - 1 去掉即可
for (let i = 0; i < firstDayWeek; i++) {
  const year = lastMonth.get("y");
  const month = lastMonth.get("month") + 1; // 0为1月所以加一
  const day = lastMonthDays - i;
  const date = dayjs(`${year}-${month}-${day}`).format("YYYY-MM-DD");
  renderDayList.push(date);
}
// 上月的信息需要做一下反转,变为 27,28,29,30
renderDayList.reverse();
2
3
4
5
6
7
8
9
# 更新 dayjs 的配置
需要借助 updateLocale插件,更改 weekStart 属性,如果不更改它会影响后续对周的处理;
import updateLocale from "dayjs/plugin/updateLocale";

const isMonday = true;
dayjs.extend(updateLocale);
dayjs.updateLocale("en", {
  weekStart: isMonday ? 1 : 0,
});
2
3
4
5
6
7
在项目,我们将起始周的设置中存储到了 pinia的 calendar store 中
