上一篇单机部署中,当我们的代码发生更新需要再次部署时,还需要在服务器上进行一次手动打包,多少还有那么一点费手。
这一篇我们使用 gitlab ci/cd 结合 gitlab webhooks 使其变为自动化。
# 技术方案
注册阿里云私有镜像仓库
gitlab ci/cd打包镜像,并将镜像产物上传至阿里云镜像仓库gitlab webhooks监听流水线事件,当流水线成功后,从镜像仓库中拉取镜像,重新部署- 当然阿里云镜像仓库也提供了触发器,两者的思路都一样,任选其一即可
# 阿里云镜像仓库
https://cr.console.aliyun.com/cn-hangzhou/instances
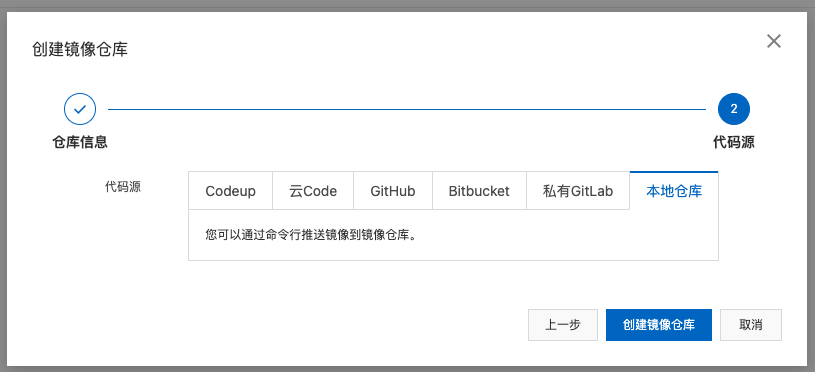
个人版目前是免费,开通之后,先创建命令空间,再创建镜像仓库
# 创建镜像仓库
选择本地仓库并创建。
tips: 想绑私有Gitlab 但没有成功,阿里云的接口一直报 503,我猜可能是想让我用他们自研的云效吧(嘿嘿嘿)

# 设置仓库密码
https://cr.console.aliyun.com/cn-hangzhou/instance/credentials
在访问凭证处,设置固定密码
# 创建 .gitlab.yml 文件
这一步骤特别简单,.gitlab.yml 并不复杂,就是构建、上传
USER_NAME和 PASS_WORD 通过变量埋进去,不熟悉变量的同学请看 前端篇 Gitlab CI/CD
stages:
  - build

build-job:       # This job runs in the build stage, which runs first.
  image: docker
  stage: build
  services:
    - docker:dind
  script:
    - docker login --username=${USER_NAME} registry.cn-hangzhou.aliyuncs.com --password ${PASS_WORD}
    - echo "登录镜像仓库成功"
    - docker build -t tutulist-web-server .
    - docker tag tutulist-web-server:latest registry.cn-hangzhou.aliyuncs.com/tutulist/tutulist-web-server:latest
    - docker push registry.cn-hangzhou.aliyuncs.com/tutulist/tutulist-web-server:latest
    - echo "镜像推送成功"
2
3
4
5
6
7
8
9
10
11
12
13
14
15
# gitlab webhooks
不管是 github webhooks 还是 gitlab webhooks 差不多都一回事,换汤不换药。
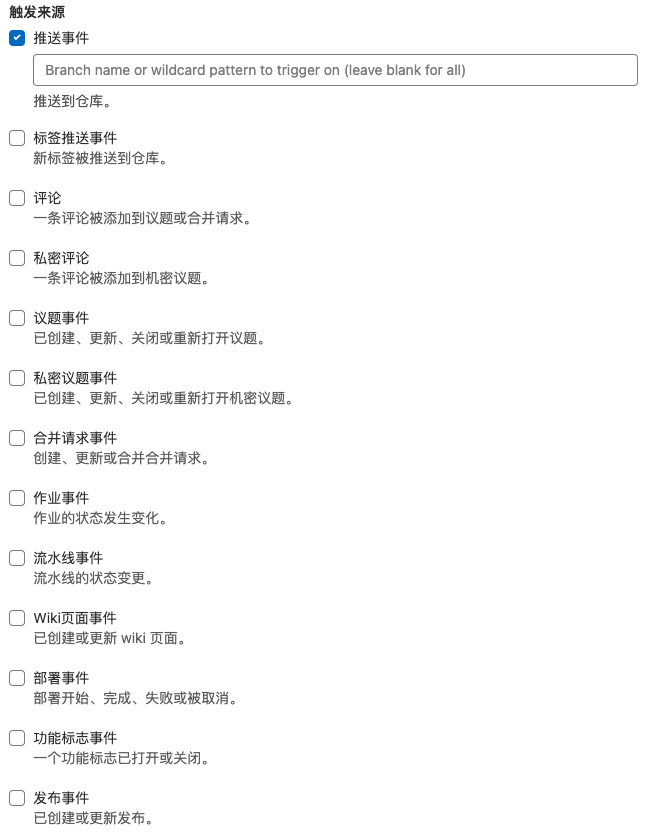
使用 gitlab webhooks 它能触发以下这些事件,你需要做的是提供一个接口的 URL 地址,当事件触发时,gitlab 会调用你提供的接口,并将相关信息以 post 请求的方式提交给你

# 创建 gitlab webhooks
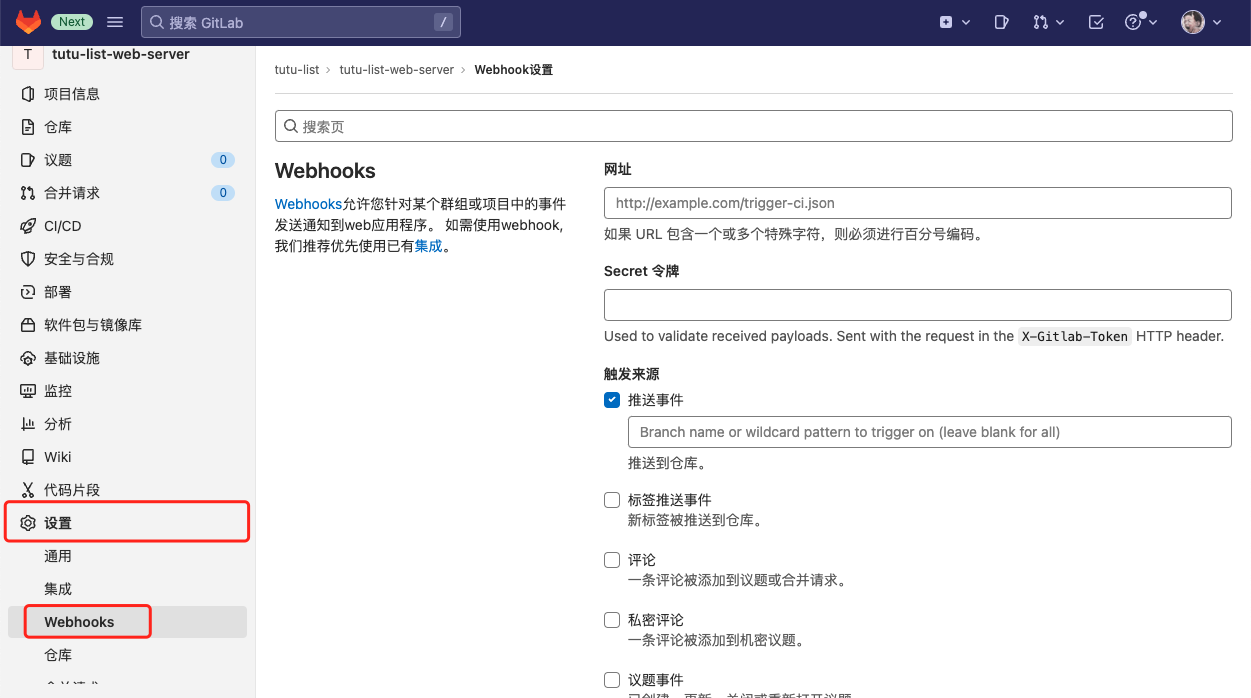
路径:项目 --> 设置 --> Webhooks
网址:你提供的 post 接口地址
Secret 令牌:建议设置上,防止被恶意调用
# 勾选流水线事件

# 创建一个 koa 项目
因为只有一个接口,就直接上代码了,主要就是做了以下 4 件事
- 验证 gitlab token,判断是否是流水线事件、判断流水线是否成功
- 登录私有镜像仓库
- 拉取最新镜像
- 重新构建
const Koa = require("koa");
const Router = require("koa-router");
const bodyParser = require("koa-bodyparser");
const shell = require("shelljs");

const log4js = require("./logs");

const SECRET = "*********";

const router = new Router();
router.prefix("/webhooks");

const logger = log4js.getLogger("access");

const handleResponse = (ctx, status, message) => {
  ctx.status = status;
  ctx.body = {
    message,
  };
};

router.get("/", async (ctx) => {
  handleResponse(ctx, 200, "running");
});

router.post("/tutulist", async (ctx) => {
  const header = ctx.header;
  const gitlabToken = header["x-gitlab-token"];

  if (gitlabToken === SECRET && ctx.request.body) {
    const { object_kind, builds } = ctx.request.body;

    if (object_kind === "pipeline" && Array.isArray(builds)) {
      const lastBuild = builds[builds.length - 1];
      if (lastBuild.status === "success") {
        // 返回成功状态码
        handleResponse(ctx, 200, "ok");

        // 开始执行相关 shell
        const { code: loginCode } = shell.exec(
          "docker login --username=15163627992 registry.cn-hangzhou.aliyuncs.com --password-stdin < ./password"
        );
        if (loginCode !== 0) {
          logger.warn("登录 docker 镜像仓库失败");
        }
        logger.info("登录镜像仓库成功");

        const { code: pullCode } = shell.exec(
          "docker pull registry.cn-hangzhou.aliyuncs.com/tutulist/tutulist-web-server:latest"
        );
        if (pullCode !== 0) {
          logger.warn("拉取 docker 镜像失败");
        }
        logger.info("拉取 docker 镜像成功, 开始build");

        const { code } = shell.exec(
          "docker compose up -d --build app --no-deps"
        );
        if (code !== 0) {
          logger.warn("执行 docker compose up失败");
        }
        logger.info("执行 docker compose up成功");
      } else {
        handleResponse(ctx, 200, `当前流水线状态为 ${lastBuild.status}`);
      }
    } else {
      handleResponse(ctx, 500, "非 pipeline 事件");
    }
  } else {
    logger.warn("token 不合法");
    handleResponse(ctx, 401, "token 不合法");
  }
});

const app = new Koa();

app.use(bodyParser());
app.use(log4js.koaLogger(log4js.getLogger("http"), { level: "auto" }));
app.use(router.routes()).use(router.allowedMethods());

app.listen(3000, () => {
  console.log("listen 3000 port");
});
2
3
4
5
6
7
8
9
10
11
12
13
14
15
16
17
18
19
20
21
22
23
24
25
26
27
28
29
30
31
32
33
34
35
36
37
38
39
40
41
42
43
44
45
46
47
48
49
50
51
52
53
54
55
56
57
58
59
60
61
62
63
64
65
66
67
68
69
70
71
72
73
74
75
76
77
78
79
80
81
82
83
# 声明 SECRET 变量
在代码中声明 SECRET 变量,值就是在 gitlab webhooks 页设置的 secret 令牌,它会在请求头中通过 x-gitlab-token 字段携带,我们要做的就是将两者进行对比,以防止接口的恶意调用
# 创建 password 文件
使用 http 登录 docker registry 是不允许使用 --password 携带明文密码的,要么将接口地址改造成 https ,要么使用 --password-stdin 的方式
在项目根目录创建 password 文件,将密码直接写在文件中,这样我们就可以通过 --password-stdin 方式登录了
# 接入 Log4js 日志
接入 **koa-log4**中间件
- 参考文章:https://juejin.cn/post/7158374376901967903
处理使用 pm2 启动时,日志不生效
- 参考文章:https://blog.csdn.net/itas109/article/details/104226963#3pm2_143
- 服务器执行
pm2 install pm2-intercom安装pm2-intercom时,因为网络问题可能会装不上。可以先执行npm config set registry https://registry.npmmirror.com将npm源改为淘宝源;
const log4js = require("koa-log4");
const path = require("path");

log4js.configure({
  // 设置日志规则
  appenders: {
    httpRule: {
      type: "dateFile", // 日志输出的类型例如
      pattern: "-yyyy-MM-dd.log",
      daysToKeep: 7, // 日志保留的天数
      layout: {
        type: "pattern",
        pattern: "[%d{yyyy-MM-dd hh:mm:ss}] [%p] %m", // 输出日志的格式
      },
      filename: path.join("logs", "http.log"),
    },

    access: {
      type: "dateFile",
      pattern: "-yyyy-MM-dd.log",
      daysToKeep: 7,
      layout: {
        type: "pattern",
        pattern: "[%d{yyyy-MM-dd hh:mm:ss}] [%p] %m",
      },
      filename: path.join("logs", "access.log"),
    },
    // 控制台输出
    out: {
      type: "stdout",
    },
  },
  // 配置日志的分类
  categories: {
    default: { appenders: ["out"], level: "all" },
    access: { appenders: ["access"], level: "all" },
    http: { appenders: ["httpRule"], level: "all" },
  },
  pm2: true,
  pm2InstanceVar: 0, // [instance id]
});

module.exports = log4js;
2
3
4
5
6
7
8
9
10
11
12
13
14
15
16
17
18
19
20
21
22
23
24
25
26
27
28
29
30
31
32
33
34
35
36
37
38
39
40
41
42
43
# 防火墙开放 3000 端口
# 创建 docker-compose.yml
将我们后端项目的 docker-compose.yml复制过来即可,但有一处需要更改
对于 app 业务容器来,之前我们需要声明 build 指令,通过指定 Dockerfile 文件的形式去构建镜像
但现在我们的镜像并不需要在本地构建了,而是要去从镜像仓库拉,所以这就需要删掉 build 命令,并添加
images指令去指定使用镜像仓库中的镜像
app:
  image: registry.cn-hangzhou.aliyuncs.com/tutulist/tutulist-web-server:latest
  container_name: app_server
  ports:
    - '7001:7001'
  env_file:
    - ./.env
  restart: always
  depends_on:
    - mysql
    - redis
  links:
    - redis
    - mysql
2
3
4
5
6
7
8
9
10
11
12
13
14
# pm2 运行项目
npm install pm2 --global
添加 script 命令
 "scripts": {
   ...忽略其它
    "start": "pm2 start src/index.js",
  }
2
3
4
# 常见错误
docker login 报错

# 测试 gitlab webhooks
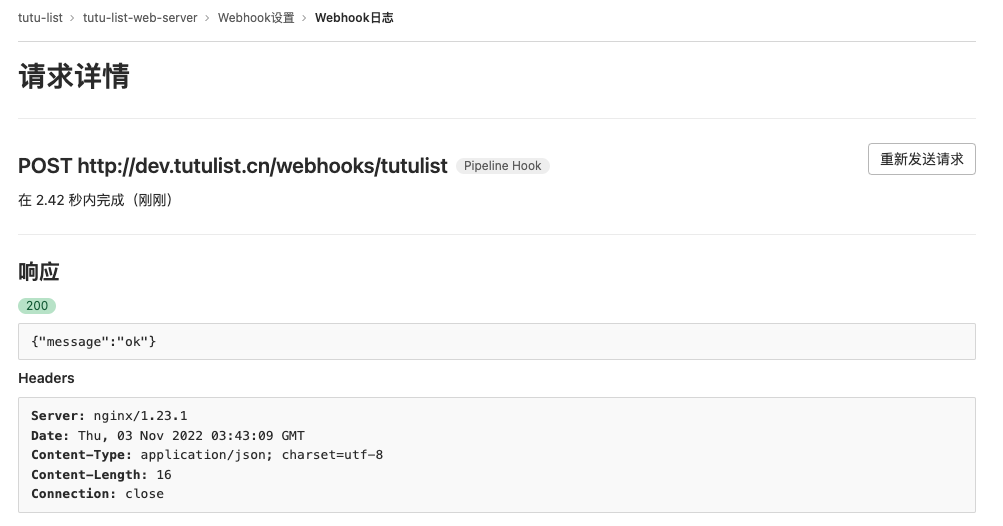
点击测试按钮,选择 pipeline events 测试是否能成功触发

点击编辑按钮,查看最近的事件和请求详情

